This document provides background information for the facilitator. It helps understand how to use the Audacity online software to produce, record or edit audio files. It is a great beginner tool for sound engineering.
General Objective
Preparation time for facilitator
Competence area
Name of author
Resource originally created in
Introduction
Simple and free to use, Audacity is the ideal tool for beginners in audio production. This workshop will remove any mystery surrounding the platform there may have been!
We will enjoy exploring basic functions such as recording and editing sound files.
Feel free to explore further afterwards. The best way to do this would be to commit to completing a project using a range of elements (instruments, file formats, sounds, etc.) while integrating effects and learning keyboard shortcuts.
To download Audacity: https://www.audacityteam.org/download/
Official user manual: https://manual.audacityteam.org/index.html
The interface
What does Audacity look like?
When you open the platform, it creates a default page corresponding to a new project.
This is what you will see when you open and/or record an audio track.
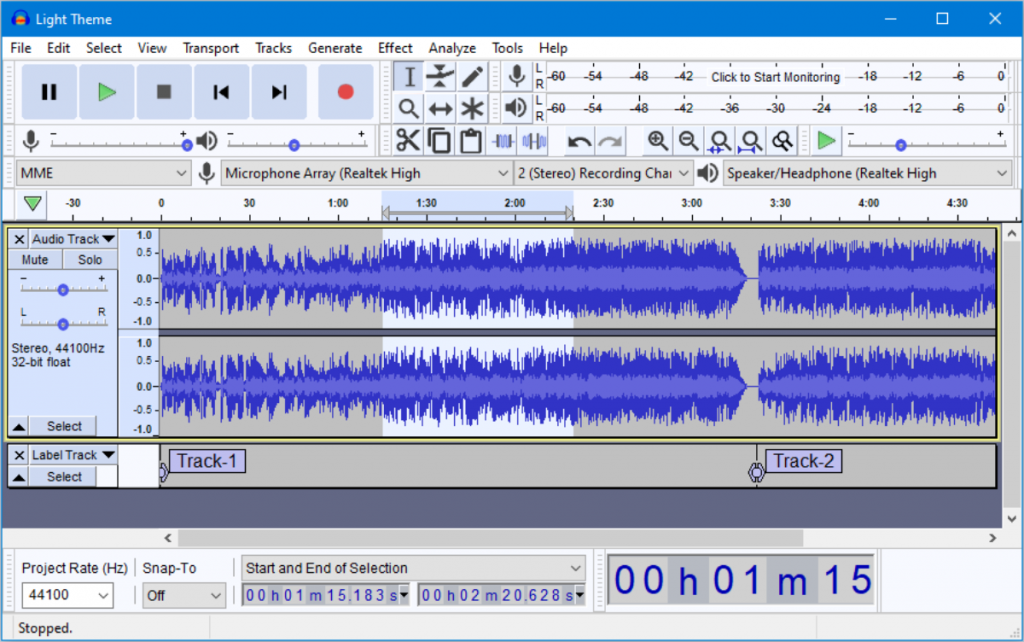
We notice three distinct sections here:
- The transport and tools toolbars on top
- The track control panel in the centre
- The time toolbar on the bottom
Creating a project with Audacity
1. Creating a new project
By default, upon opening the program, a new project is created, presented via the basic interface. If the window does not appear or you already have other projects open, you can create a new one by clicking on ‘File‘ on the top left of the window and then on ‘New‘.
2. Importing sounds
The first tasks consists of placing a first track in your project. For this you can import a file from your computer or record using your microphone if you have one connected to your computer:
- from your computer
You can import sound files from your computer in two ways.
- Browsing your computer to locate a specific file: go to ‘File’, then ‘Import’ then ‘Audio’. Once the right file is selected, click ‘Open’ and it will be imported to Audio as an isolated track.
- Drag and drop: find the file you want to import and drag and drop to Audacity.
- using a microphone connected to your computer
If you have a microphone connected to your computer, Audacity can detect it as a source for recording audio. If your source is properly detected, you can start recording by pressing the red circle button. A new track will appear and you will see waveforms corresponding to your audio signal.  To stop recording, click the square. Now you know how to add one or several tracks to your project. We will look at different ways to edit, place and adjust tracks.
3. Modifying tracks
Audacity allows users to group tracks to be worked on together and mixed.
- Adding tracks
Adding a track is automatic if you import sounds or do a microphone recording. But you may need to add a track manually in order to use extracts or to rework a part of your production. To add a track: go to the menu bar, click on ‘Tracks‘, then ‘Add new…‘ and choose the type of track you want.
- Deleting tracks
Click on the x in the top left of the track in the track control panel.
- Mixing tracks
Each track has its own audio volume. To adjust these in order to balance your compositions: go to ‘View’ in the menu bar and choose ‘Mixer Board…‘
Overview of Audacity's project window
We will now look at a general overview of Audacity’s project window. You don’t need to know how everything works starting out – you will naturally build your skills through experience. We will just give a summary here to give you an idea of the possibilities available. The functionalities are numbered 1 through 17, some of which you already know from the previous steps.
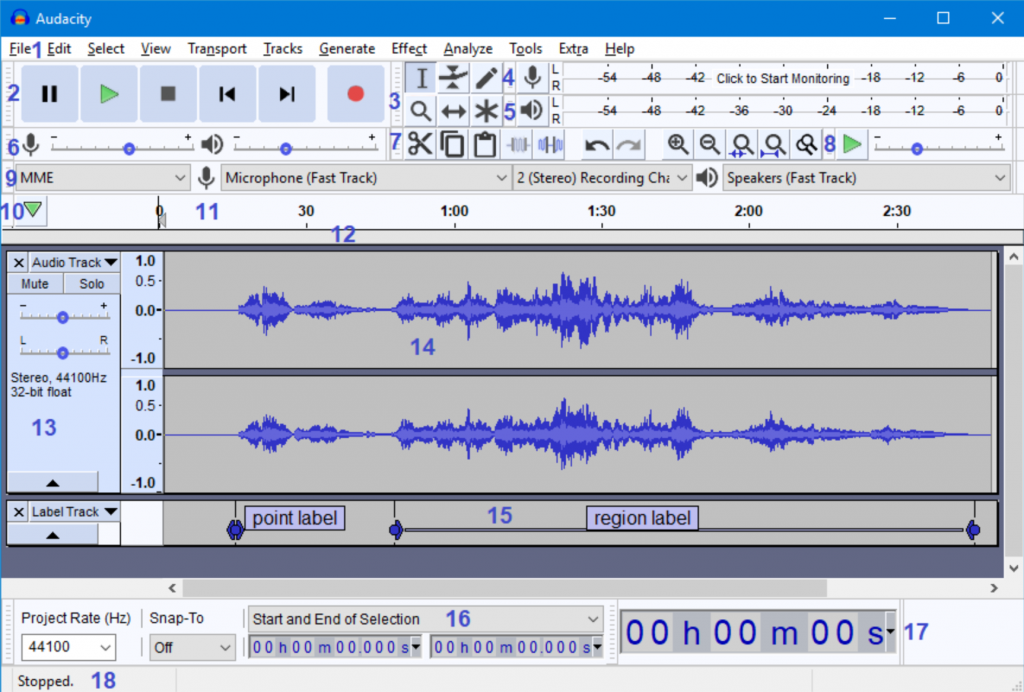
The numbers correspond to the following:
- Menu bar: as with any other file editor (text, graphic design, powerpoint, etc.), this bar allows us to select various actions.
- Transport toolbar: this is the one we use most often, as it allows us to pause, play or stop a tracks as well as to navigate backwards or forwards. The red circle starts recording, while the square stops.
- Tools: various tools to select, adjust the volume, zoom in and out, fade or snip your tracks, and much more.
- Recording meter: this shows the input level of your audio as you are recording. It allows you to easily see whether your sound is clipping (i.e. too loud, creating distortions).
- Playback meter: here, the combined levels are displayed of all tracks in the project played simultaneously.
- Mixer: the mixer tool is used to adjust the tracks’ playback and recording levels.
- Editor: used to cut, copy, paste, reduce, silence, undo/redo, zoom, expand or contract a selection, and more. It is an alternative to using the menu or keyboard shortcuts.
- Play-at-speed toolbar: plays tracks at accelerated or reduced speeds.
- Device toolbar: a convenient way to configure the recording signal chain – microphones, preamps and other external devices you might be using – as well as the audio output, without needing to go to Preferences>Devices.
- Pin: used to mark certain points in the recording.
- Timeline: measures the time from zero (i.e. the beginning of the track). Can also be used to rapidly play the track of an extract as well as to establish loops.
- Ruler: use this to select, search for or delete a section from the selected track.
- Track control panel: controls tracks’ status indicators; includes a dropdown menu for modifying a track’s appearance as well as their individual properties.
- Audio track: visualises your track’s waveforms. Tracks can be recorded in stereo (combining two audio channels: right and left), mono, or can be split into two channels (right and left) which can be edited separately using the control panel’s dropdown menu.
- Label track: markers here can be used to reference points or segments of your project but the label track itself does not contain audio. Label tracks are additional tracks that can be added (Edit>Labels>Edit Labels).
- Selection toolbar: selects an extract from the track depending on the temporal markers.
- Time toolbar: read-only toolbar which displays the current audio position.
- Status bar: displays messages about recording or playback, to indicate parts of Audacity that are being hovered over by the cursor, and to provide hints about how to use Audacity.