This document contains background information for facilitators before they run the workshop with participants. It gives an introduction to the basic functioning of the Scratch programming tool.
General Objective
Preparation time for facilitator
Competence area
Name of author
Resource originally created in
Some background for context
In 2006, MIT developed a new programming language: Scratch. The goal here is to make programming accessible to kids from 8 years old. The platform is free and has been translated into 20 languages. Everything made using Scratch can be freely shared and reused by other users, as it is under an open Creative Commons license.
The language is in the form of blocks which users have to put together to form lines of code. This is like visual version of Smalltalk, an object-oriented language which had a large influence on other languages such as Java and Ruby. Scratch is therefore quite versatile: it allows you to modify the code directly during its execution. Its use is game-based – users move around colourful blocks and observe the results immediately.
More practically, Scratch is a real coding language as it involves programming basics such as loops, conditions, variables, etc. It is ideal for explaining algorithms to newcomers of all ages in an accessible way. It is an effective educational tool. Users can create everything from simple animations to complex games.
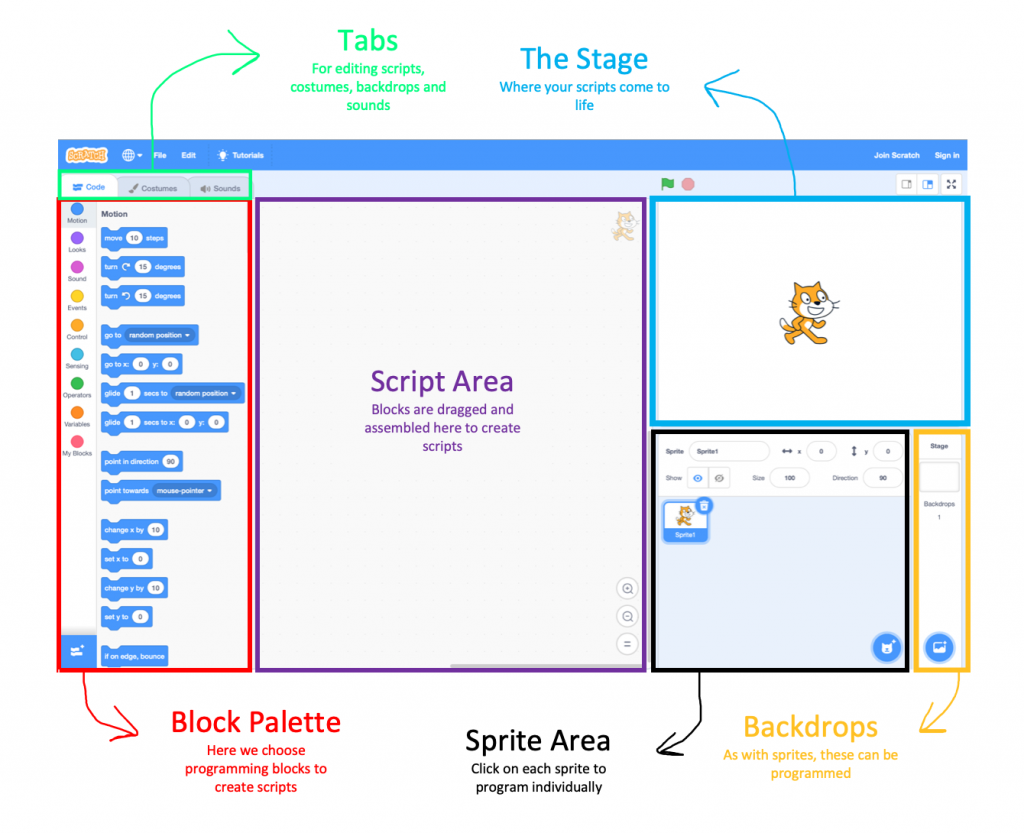
Development environment
 <img class=”alignnone size-large wp-image-21735″ src=”https://voyageursdunumerique.org/wp-content/uploads/2020/05/Screenshot-2020-07-23-at-11.31.48-1024×833.png” alt=”” width=”1024″ height=”833″ />
Sprites
Sprites are the elements that you will program individually by sliding programming blocks to the scripting area. Before writing your code, make sure you have selected the correct sprite.
By right-clicking on the sprite’s icon, a menu opens. You can duplicate, export or delete your sprite.
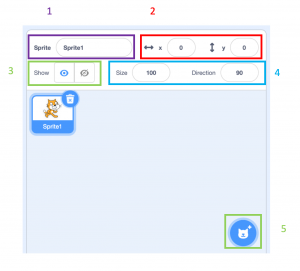
Here are the different parameters accessible from the Sprite Info Pane:
1: Change the name
2: Change the sprite’s position on the backdrop by modifying their coordinates on the x and y axes (you can also move the sprite directly by dragging and dropping)
3: Choose to hide or unhide the sprite on the backdrop
4: Change the size and direction. By clicking on direction, you can access extra settings from which you can choose between three different rotation styles (from right to left): you can have it so that the sprite circles 360°, that it moves to the left or to right or that it does not move at all
5: Add a sprite. There are different ways to create a one: we can choose one from the Scratch library, draw one or import an image file.
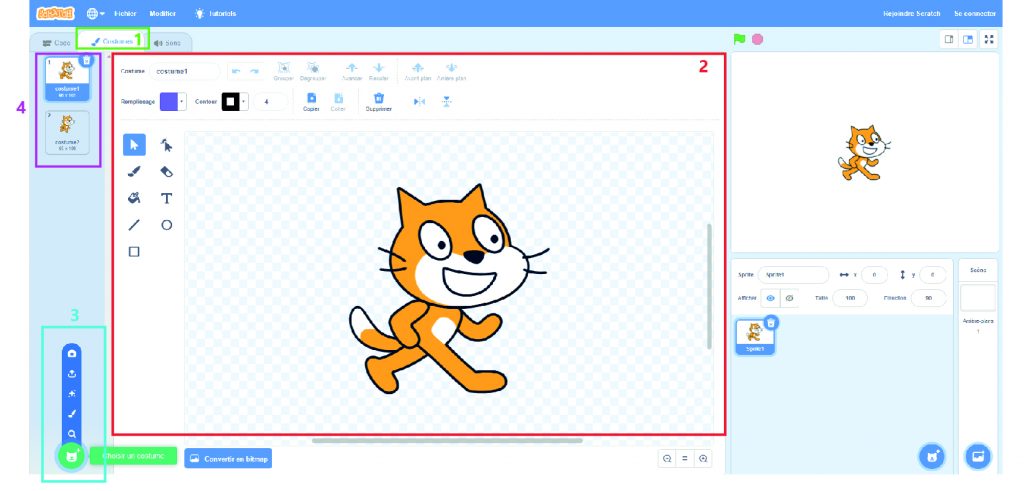
You can also customise sprites using the Costumes Pane, found on the top left of the screen. Costumes allow us to program the sprite’s appearance. It is also possible to set the sprite to have several costumes. Animations and effects can be created by quickly moving from one costume to the other (using programming blocks).
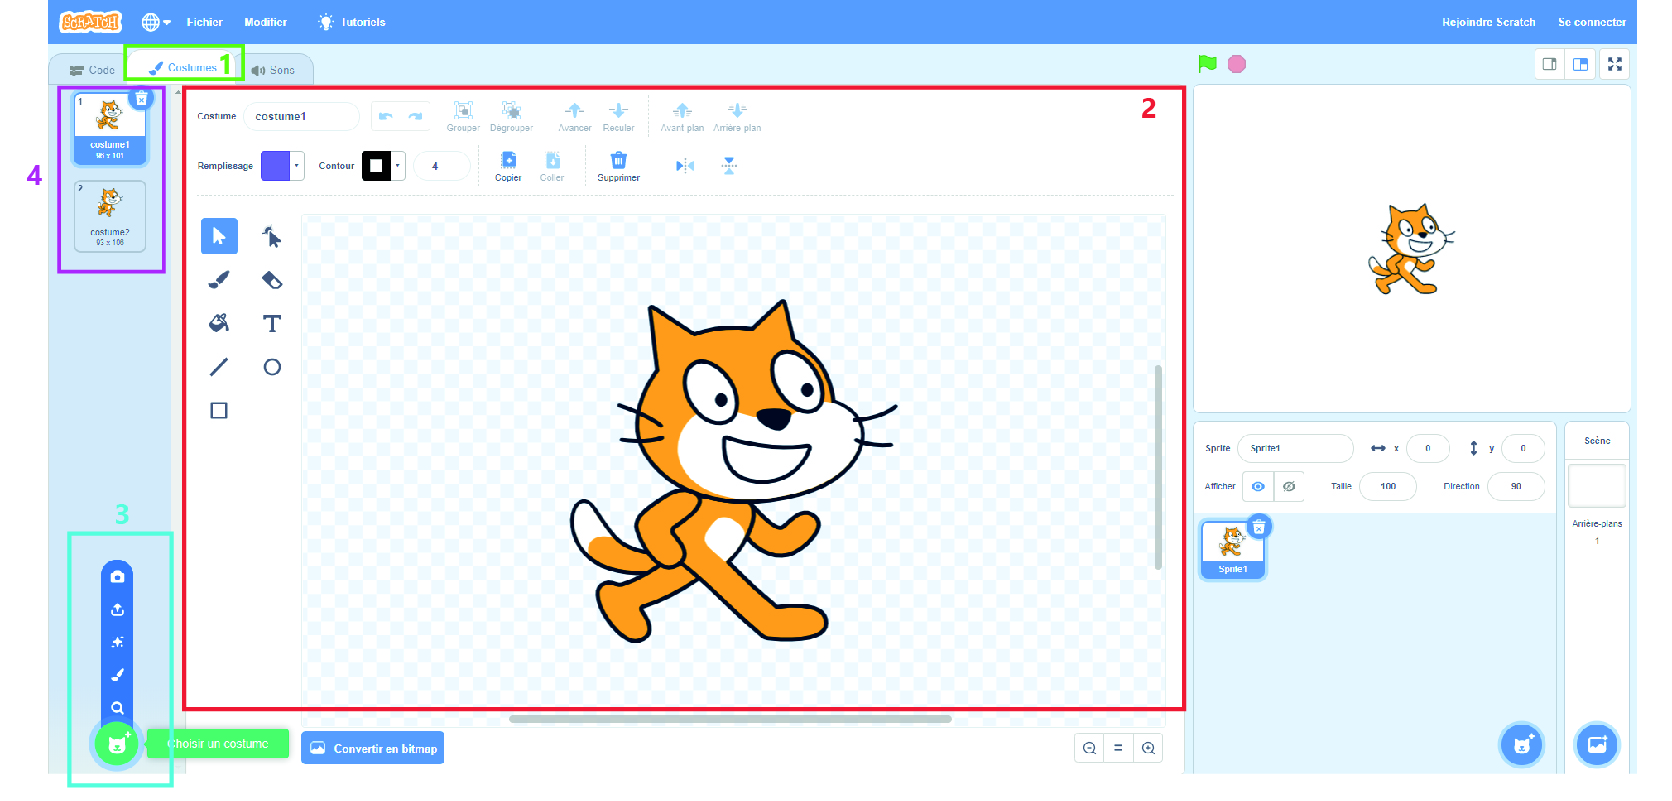
1: Costume tab
2: Costume pane. Here you can change the shape. colour, add elements…
3: Create or add new costumes by using the Scratch library, drawing your own or importing an image file.
4: Edit the different costumes associated with the sprite. By right-clicking on the costumes here you duplicate, export or delete it.
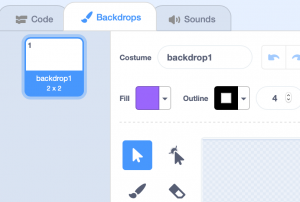
Backdrops
Scratch allows the addition of backdrops to your stages and to program these in the same way as sprites. For this, select your backdrop and drag the programming blocks of your choice to the scripting area.
The Scratch tool choose a white backdrop by default, but it is possible to change this using the Scratch library, drawing one or importing an image file. As with sprites, you can add several backdrops in order to create animation effects. In the pane that appears in the bottom right of the screen, you will see which backdrop is currently visible in the stage area. To see all your backdrops and to add more, click on the Stage pane in the bottom right, then on the Backdrops pane in the top left. In this tab, as with the ‘Costumes’ tab previously. you can modify your backdrops.
Various block types
Each block is categorised which are feasible recognisable by colours. ![]() By exploring the different sections, you will see that not all blocks have the same shape. Before going into the details of what each block does, let’s look at these shapes, of which there are five:
By exploring the different sections, you will see that not all blocks have the same shape. Before going into the details of what each block does, let’s look at these shapes, of which there are five: 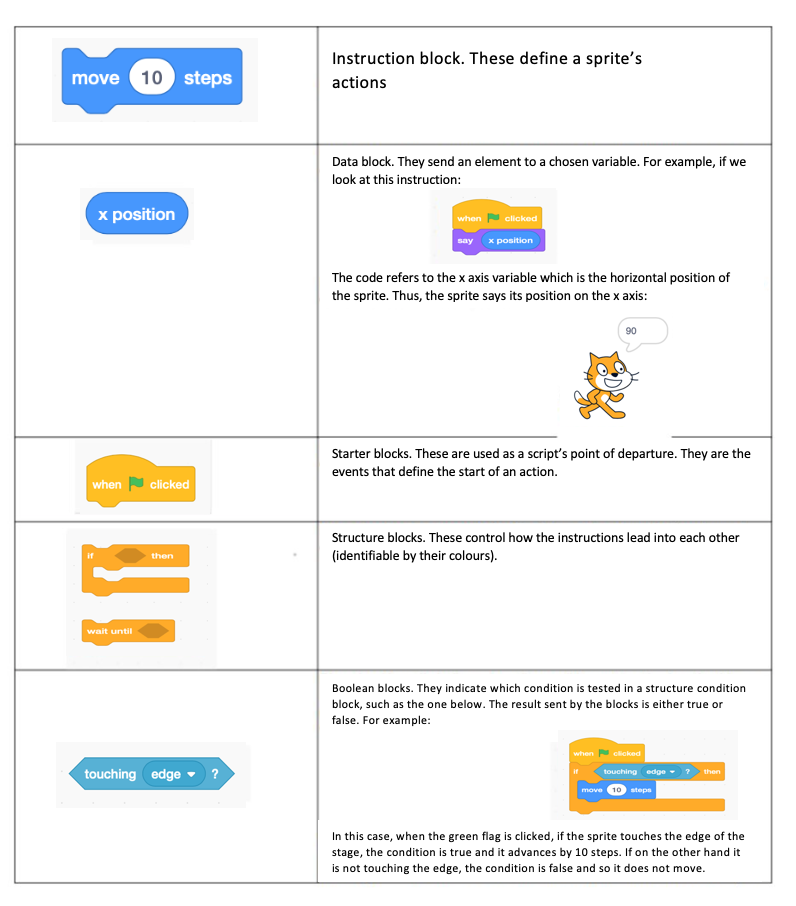
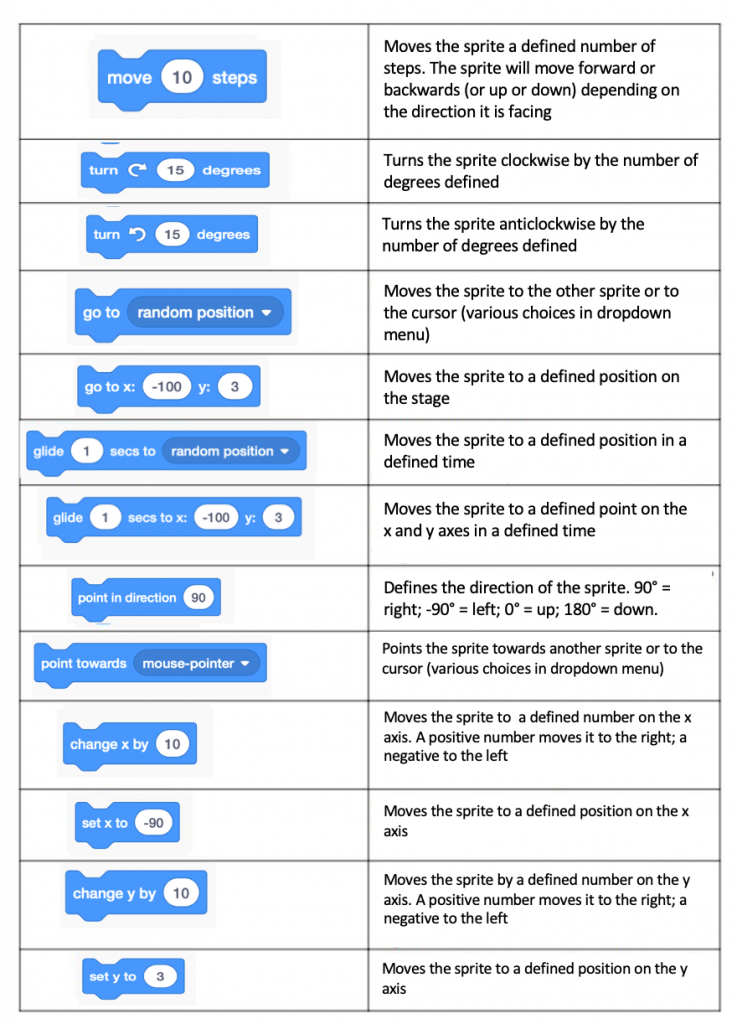
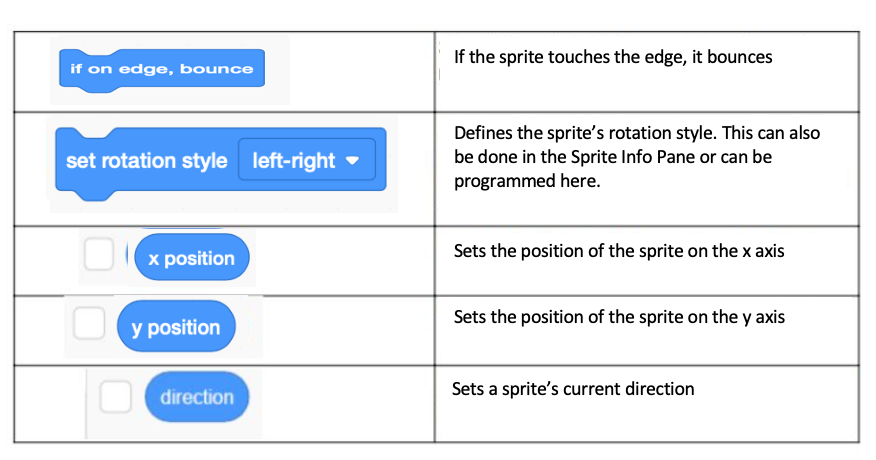
Movement blocks
Looks blocks

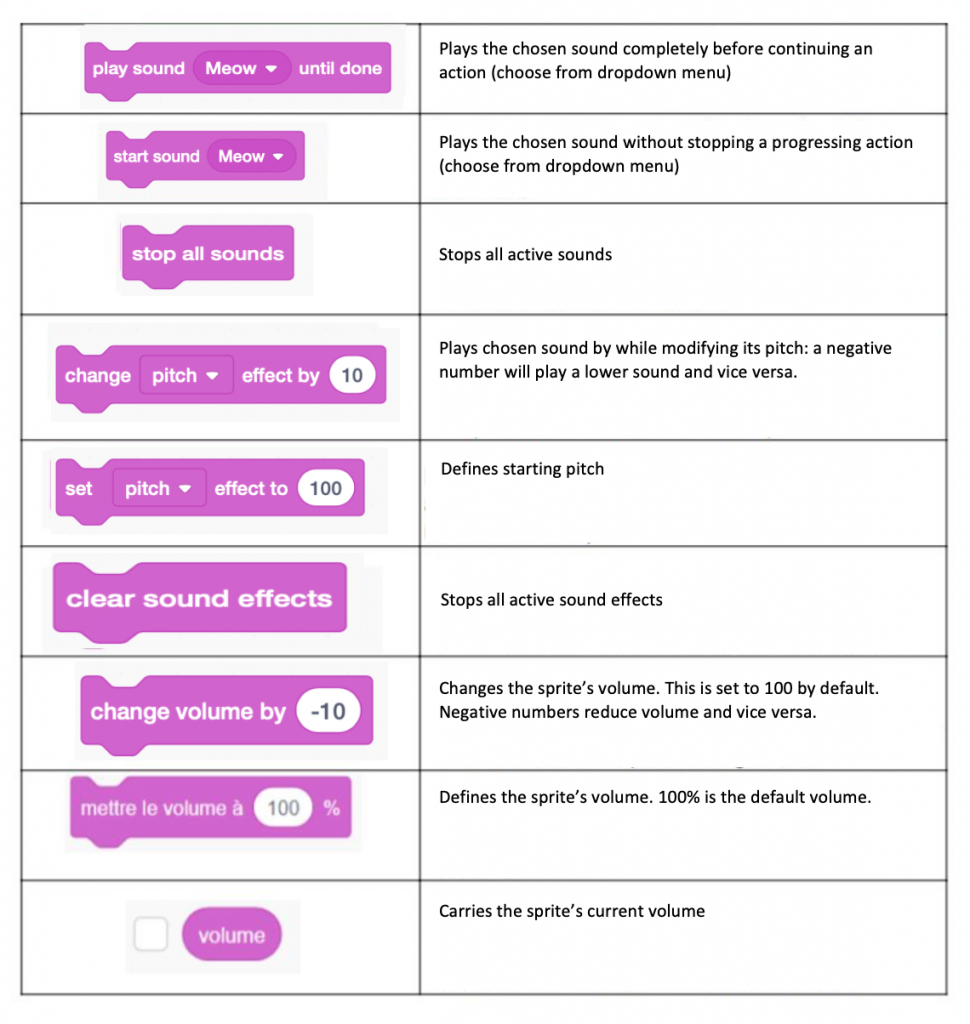
Sound blocks
Events blocks
Event blocks define the sprite’s actions. These actions can be different for each sprite.
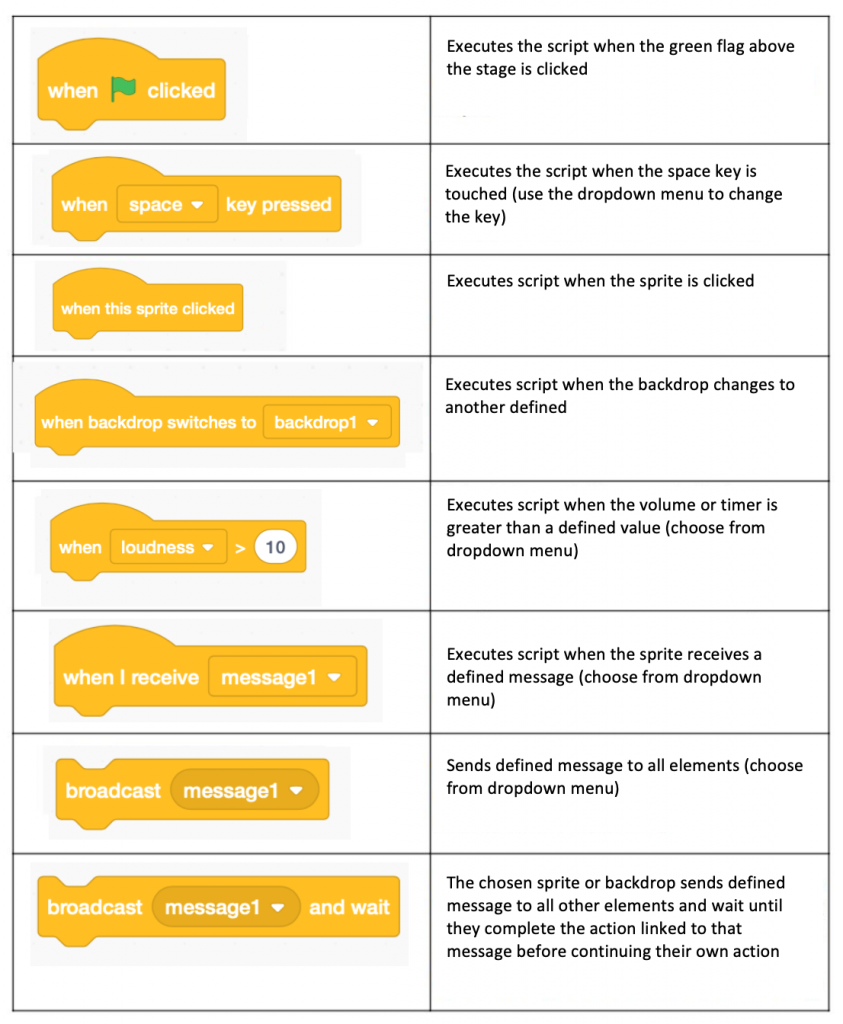
For the block ‘broadcast and wait’: defining a message allows the synchronisation of actions between elements (sprites and/or backdrops). For example, a sprite could, as part of an action, send a message to another sprite which would only start its action when it receives this message. If we program the first sprite to ‘broadcast message1’, it will send the message as it completes its action. On the other hand, if we program the first sprite to ‘broadcast message1 and wait’, it will send the message and wait – for the second sprite to finish the action linked programmed by the message – before continuing its own.
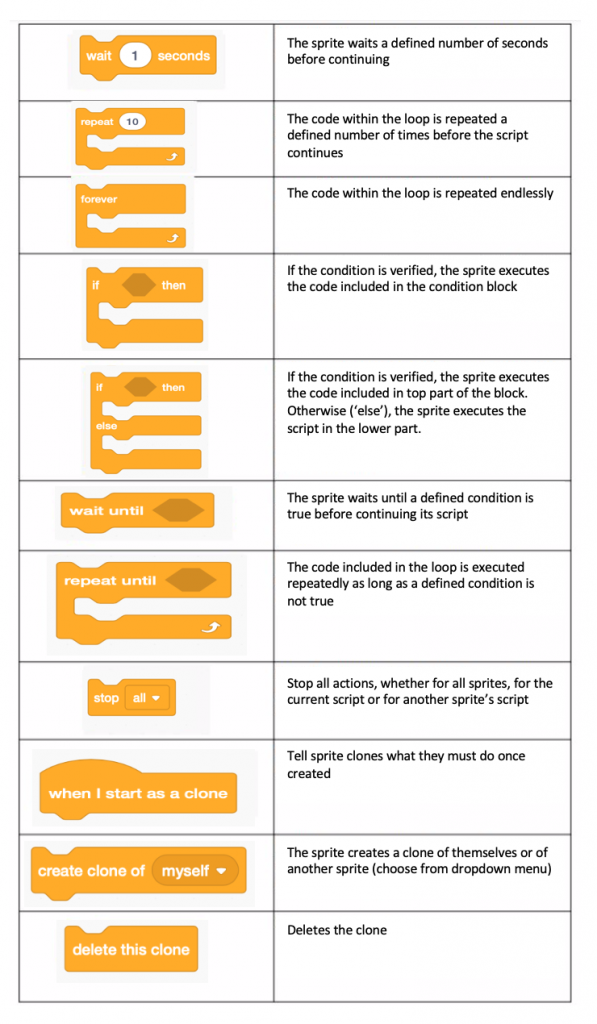
Control blocks
Sensing blocks
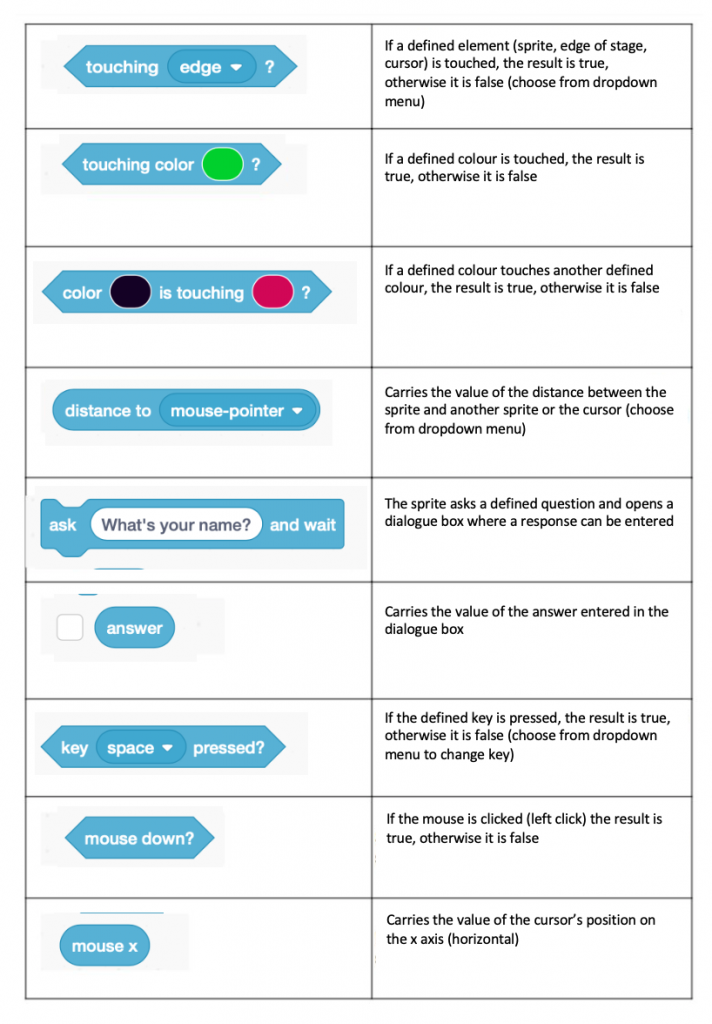
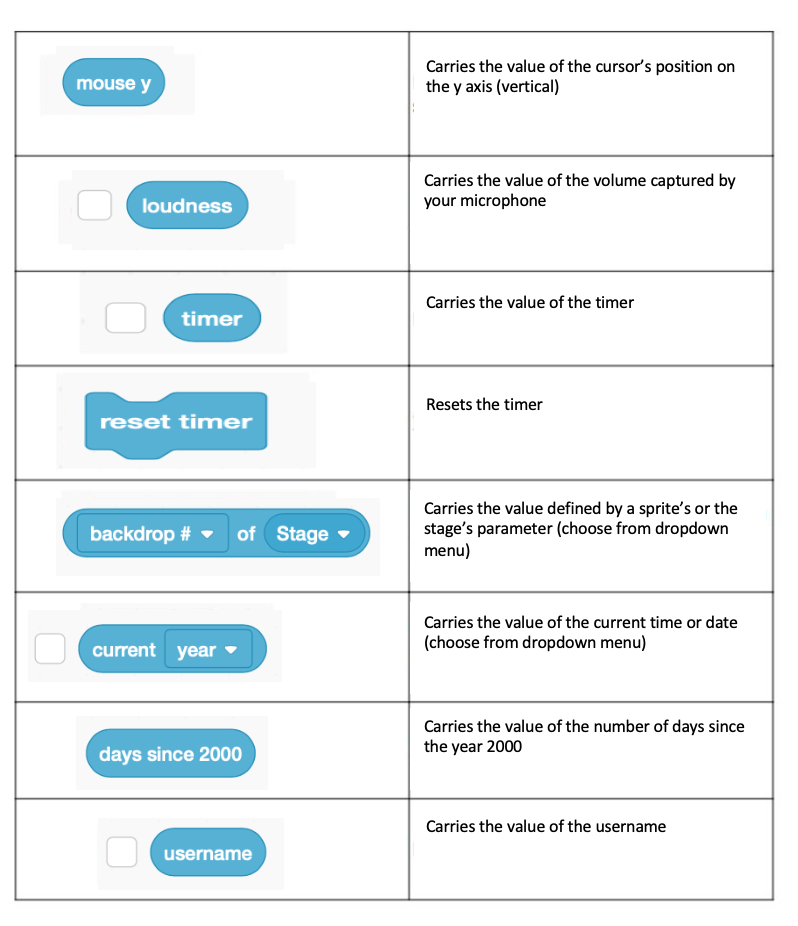
- The loudness block: the use of this requires your device to have a microphone. This allows the program to capture sound from the real environment. In this way, it is different to the volume block from the Sounds section as this controls a sprite’s volume within Scratch.
- The timer block: a timer is always running. If we want it to start from zero at when an action is executed, we need to use the block ‘reset timer’. The timer won’t stop, but it will restart from zero.
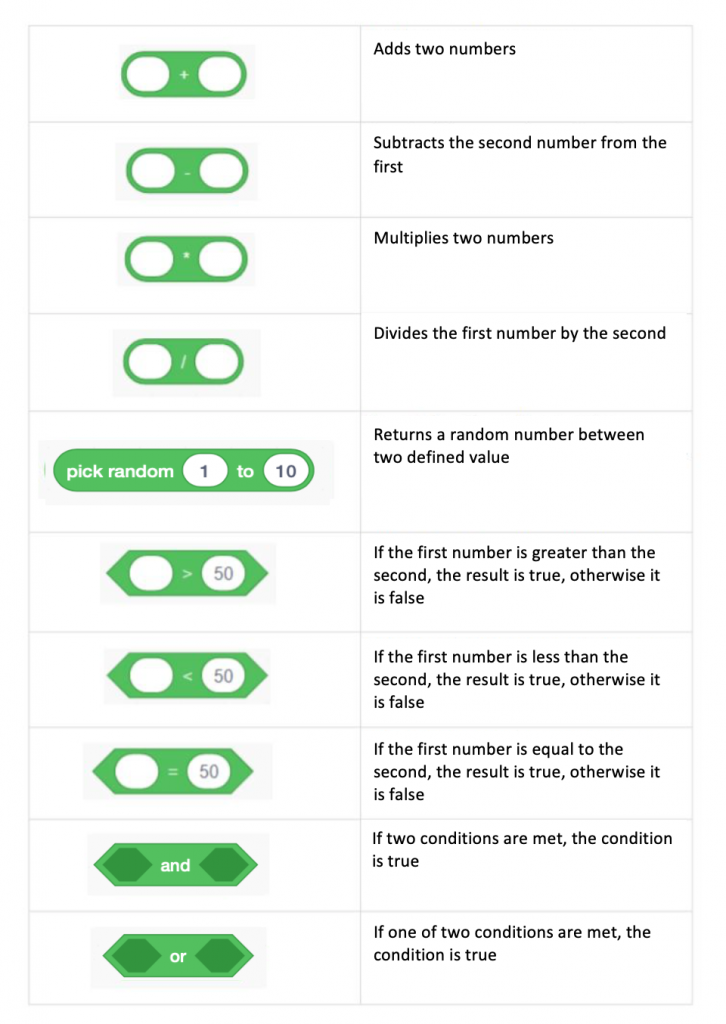
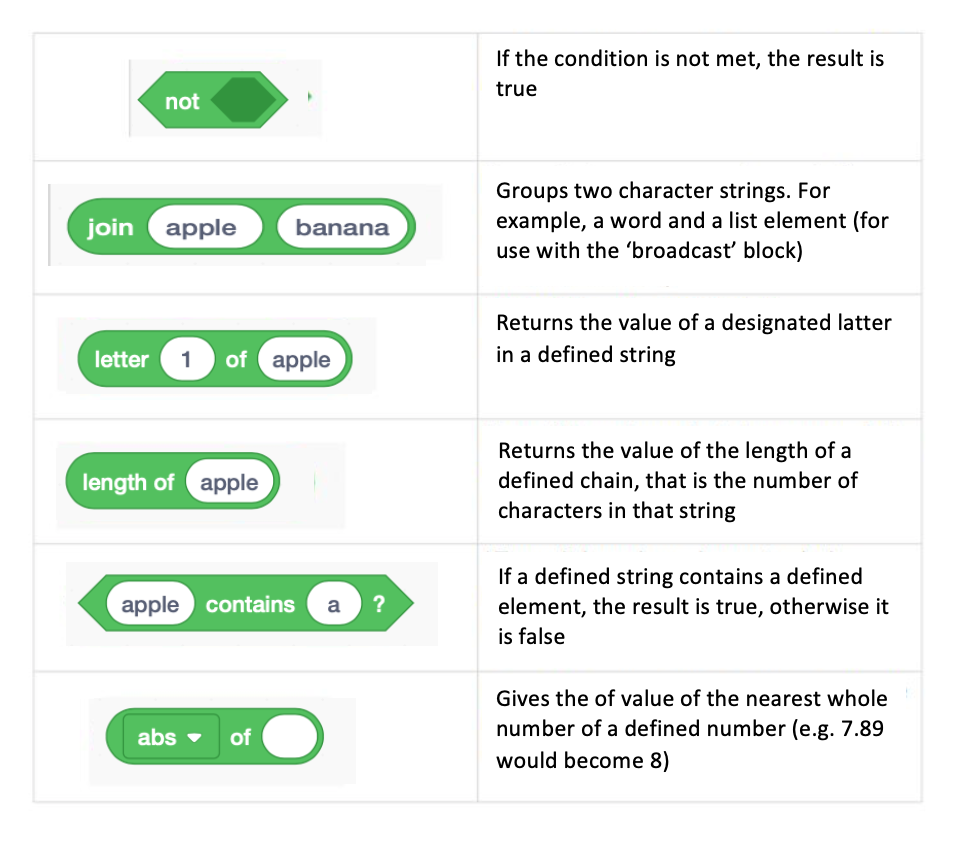
Operator blocks
Operators are used to make calculations. As a number can be positive or negative, it is important to take the sequence of your calculations into account. In the operator blocks, we find numbers, character chains (word, word sequences, spaces, special characters, etc.)
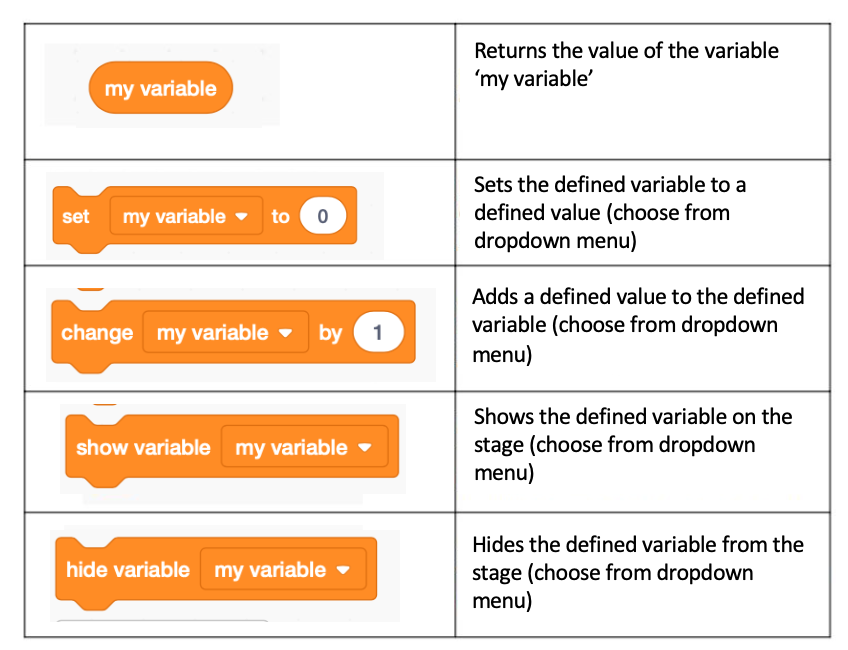
Variable blocks
Creating a variable
A variable is a storage unit in which the computer can reserve data. For example, the score of a game is a variable: a basic value is stored and changes during a game according to program’s calculations resulting from the players’ actions. To create a variable, click on ‘Make a Variable’ in the Variables section. This window will then open:
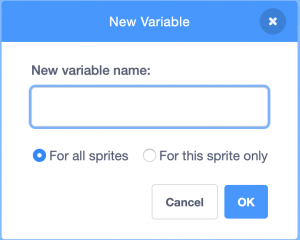
We could make a variable, for example, ‘score’. We would then need to decide whether this variable applies to ‘this sprite only’ or to all sprites. If it is only applied to one sprite, it will work independently of the other sprites created. If it is applied to all, it will vary depending on the actions of each and any created sprite. However, if you decide at a later point to modify this variable (that has been applied to all sprites) for only one sprite, it will not work unless you change its basic settings to apply to that sprite only.
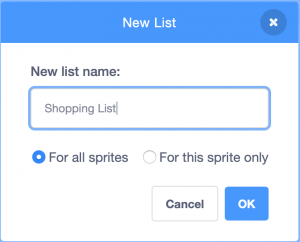
Creating a list
A list is a data structure allowing simpler grouping, organisation and treatment of information. For example, it is possible to create a list of words that your sprite will display randomly. To do this, click on ‘Make a List’. We can then, as before, choose to apply this list for one sprite only or for all sprites. We could for example create a list called ‘Shopping List’.
Going further
Head to Scratch to find many resources:
- Published projects
- Tutorials
- Coding cards to be used in your own projects
- Ideas for workshop facilitation
And of course there are many Scratch workshops available on our website!