This is a tutorial on how to program a hologram on Scratch.
General Objective
Preparation time for facilitator
Competence area
Time needed to complete activity (for learner)
Support material needed for training
Resource originally created in
Introduction
This is a workshop on the subject of 3D imaging. It can be preceded by an introduction to VR goggles. It is a relatively broad activity but including Scratch programming to create moving characters is quite innovative.
For this, we were inspired by an activity (in French) by Sarah Lacaze.
Our thanks go to her for allowing us to adapt her ideas. The three phases (introduction, creation, programming) can make a complete workshop, but they can also be done independently depending on the time available.
Preparation
Print several pyramid patterns (see the next step).
Make a transparent pyramid to be used a demonstration (cf. the instructions below).
We strongly recommend that you follow the programming section yourself in advance so that you understand which obstacles or surprises may occur for participants.
Introduction to holograms (10 mins)
Use the transparent pyramid to introduce the hologram concept to the group. There are many YouTube videos you can use to support your explanation, such as this one.
You need to place the transparent pyramid on a tablet, turn down the lights and wait for the remarks and questions come in : ‘What’s it called ?‘ It’s a hologram.
The word comes from the Greek holos (‘entirely’) and graphein (‘write’). It’s a three-dimensional image that can be animated and appear to float in the air. ‘How does it work?‘ A 2D image is projected to the four corners of a pyramid in a transparency (cellulose acetate).
One part of the light passes through, another is reflected (towards the eyes of the viewer), thus creating the illusion of an object in three dimensions, hanging. Real holography, a variant on photography, is more complex (see Wikipedia), but the technique given here allows participants to understand through a few simple principles : it’s actually just light dissonance between several identical images that creates the illusion of three dimensions.
Does it work if the pyramid is upside down?‘
No but go ahead and try.
Making a screen for projecting the hologram (30 mins)
Participants will now need to make a screen on which the project a home-made hologram to impress their family and friends.
The projector screen is made up of 4 isosceles trapezoids (the two non-parallel sides of the same length). The dimensions of this pattern are given below.
You can make a larger screen.

You will need to cut, using scissors, the edges of the pattern in a sheet of rigid transparent plastic. The interior sides must be folded to form the pyramid.
To make folding easier, press the sides with a scissor blade. Once cut and folded, use transparent sticky tape to stick the little flap to the other edge, joining the two sides together to create the pyramid. Now it’s done!
Programming (40 mins)
Scratch Holograms
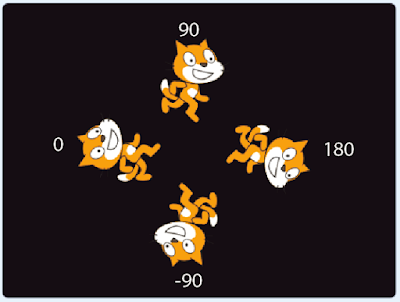
To create a hologram you have to choose, or draw, a sprite and then duplicate it three times. In total, you will need four identical sprites on the screen.
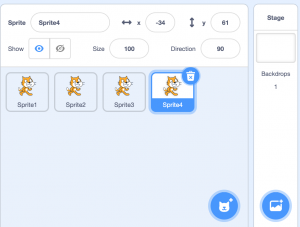
Each sprite needs to have a different orientation. In Scratch 3 the orientation of the sprites is modifiable in the Direction field in the area containing Sprite info (above the Sprite area).
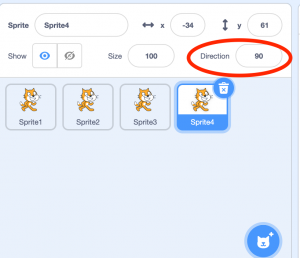
The four sprites need to have be oriented in the following respective directions: 0, 90, 180, -90. The projection screen will be positioned at the centre.
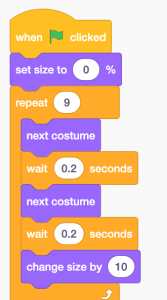
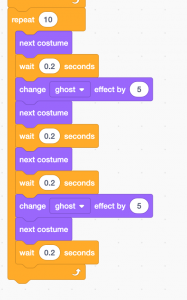
Animating the cat
Programming the cat is done through four loops. Each cat sprite will have two costumes — in each of the loops you will see a number of blocks to change from one costume to the other, thereby giving the impression that the cat is walking
First loop
Second loop
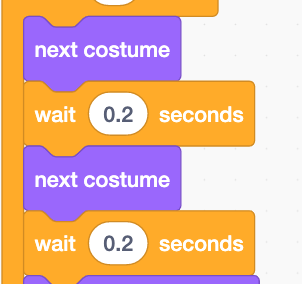
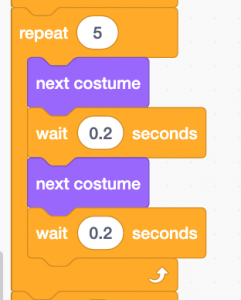
This is for animating the cat by alternating between two costumes
Third loop
Fourth loop

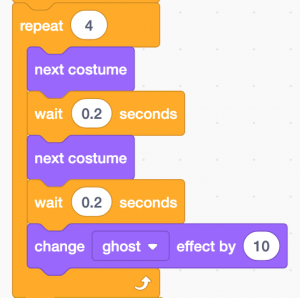
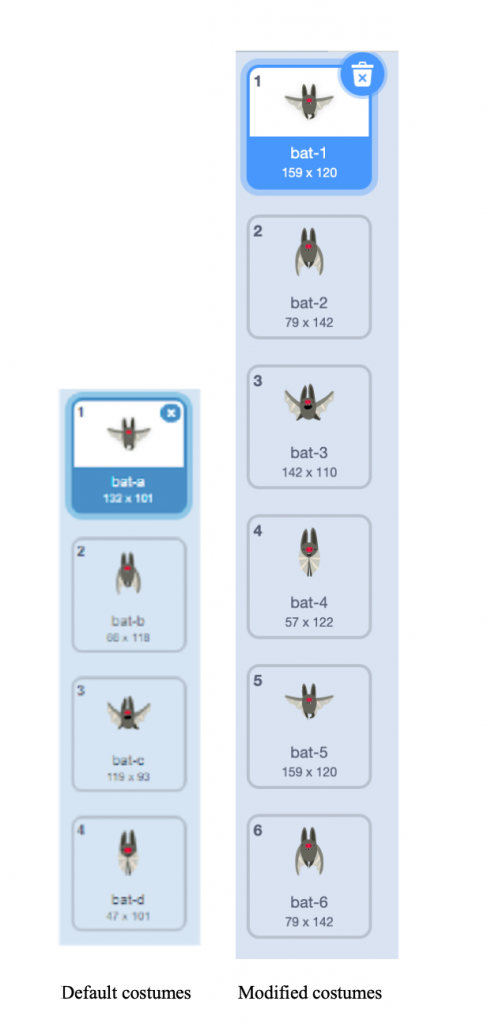
Animating the bat
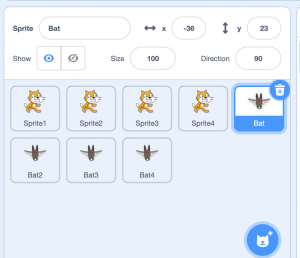

This sprite will have four costumes to animate it in order to give the impression that it’s flying. It is possible to modify the position of the costumes and to duplicate others in order to make the animation more fluid
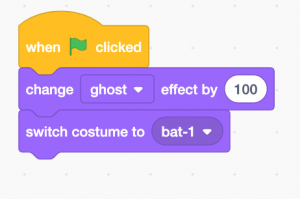
The programming comprises two block groups. First group This is the initiation. At the beginning of the program, the bat sprite is not visible (‘change the ghost effect by 100’)
Second group
When a message is received (‘when I receive bat’), the bat will start to appear gradually (‘change ghost effect by -5) while beating its wings
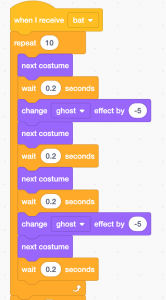
(Note : remember to copy all these block groups to each matching sprite duplicate.)
Going further
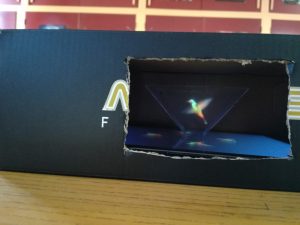
For a better rendering of the hologram, nothing beats darkness. To bring in a mysterious side to proceedings, you can create your own dark room.
This is easy to do : all you need is to cut a rectangle out of the side of a shoebox in which you can insert the tablet with the pyramid on top.