In this workshop, participants will be guided to create an interactive adventure by using the Scratch programming tool to develop a simple storyline. They will learn to create a background, insert ‘sprites’ and customize the progression of the story.
General Objective
Preparation time for facilitator
Competence area
Time needed to complete activity (for learner)
Name of author
Support material needed for training
Resource originally created in
Introduction
This is a tutorial on the basic functions of Scratch through the creation of a short interactive story. This is meant for an audience new to Scratch and shows the basics of movement, following a cursor, dialogue and messaging.
Choosing the backdrop
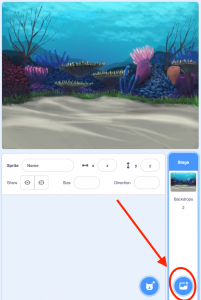
First you will need to choose the backdrop. Click on the backdrop icon on the bottom right of the screen. Choose something suitable from the Scratch library, for example ‘Underwater2’ in the ‘Outdoors’ folder.
The backdrop needs to be visible. To do this, it needs to appear at the beginning of the animation. Create the following code in the stage script: 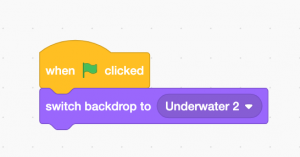
Creating and animating a character
Add your central character. For this, create a new sprite by clicking on the sprite icon near the bottom right of the scene. Choose octopus, for example: 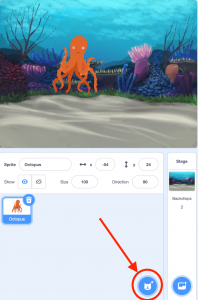
The sprites proposed come with several costumes, showing the character in different poses. Costumes can be used to animate the sprites. Write the following blocks in the octopus’ script.
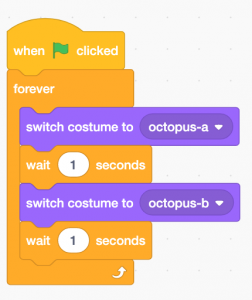
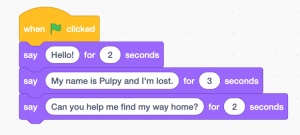
Code explanation: then the game starts (i.e. when the green flag is clicked), the sprite will indefinitely go through the following cycle: start with costume A, wait 1 second, change to costume B, wait 1 second, etc. Click on the green flag to test the code. As costumes A and B show the octopus in different positions, it creates an illusion that it is moving. Try different wait values (2 seconds, 0.5 seconds…) and click on the green flag to test the different animation speeds. Now, the octopus needs to speak. Two ‘say’ blocks can make this happen. Add several duration blocks (‘say…for…seconds’) and complete them as below to create a dialogue: -Hello! -My name is Pulpy and I’m lost. -Can you help me find my way home?
Now make it so that the sprite follows the cursor which will mean the player can move it around the stage. To do this, recreate the following code: 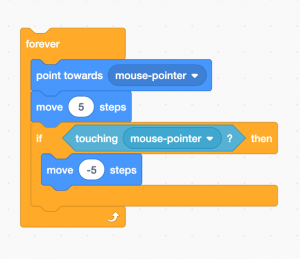
Code explanation: the sprite will first move towards the cursor, then move forward 5 steps. If it touches the cursor, it will move -5, in other words move backwards very slightly. Join the two blocks as follows:
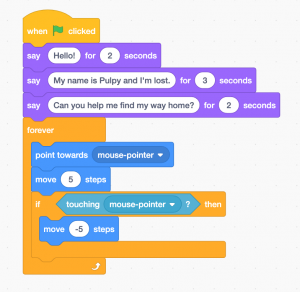
After it finishes the dialogue, the octopus will move towards the cursor. To understand why the cursor needs to move backwards, try removing the block and clicking the green flag to see what happens: the sprite will act erratically. By adding the ‘if…then’ condition we prevent this from happening.
Starting the adventure
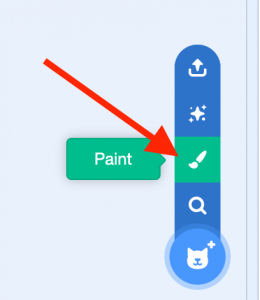
We now have our setting and protagonist but are missing a quest. To move from backdrop to backdrop and to meet new characters, first create a sign to click in order to progress from one setting to another. Click again on ‘Choose a sprite’ and this time choose the paint function.
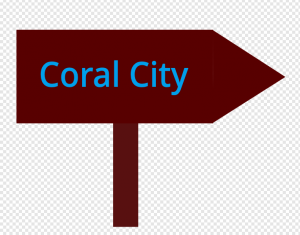
Draw a sign and use the text tool (the T icon) to write the name of the destination, for example Coral City.
When the sign is visible and clicked, the backdrop should change. Add the following blocks to the script:
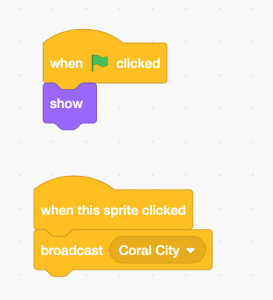
Code explanation: when green flag is clicked, the sign will appear (‘show’). When the sign is clicked, it sends the message ‘Coral City’ (click on the dropdown menu then ‘new message’ and give this a name) to all the components of the game (backdrop, sprites, etc.) This message tells Scratch that something is happening and that it should react. We can add triggers to the backdrop meaning it will change. Click on the stage and add the following blocks:
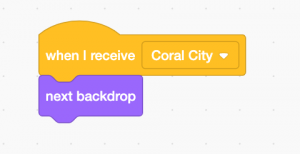
When the backdrop receives the ‘Coral City’ message, it will change to the next backdrop in the list. The message sent by the sign will be sent to the backdrop and the latter will react by changing itself. Messages mean the user can do many things that would otherwise not be possible. In this example the sign itself does not change the scene directly. Instead, it sends a message to achieve the same result indirectly. But what will the backdrop change into? Add a new one! Click the ‘Backdrops’ tab and then again on the button on the bottom right of the screen. Click the green flag to test the code. We see that the change between backdrops happens very quickly. We can stylise the change a little by adding the following blocks:
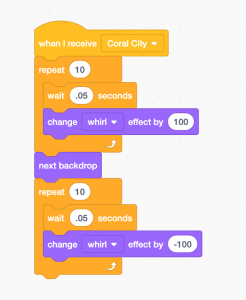
Code explanation: when the backdrop receives the message ‘Coral City’, in 10 iterations (repeat 10), it will wait 0.5 seconds then deform itself (‘whirl’ effect) before changing completely. Then it will repeat the same process but in reverse (the value is now ‘-100’ whereas the first time it was 100). To test the result, click the green flag, then the sign.
Going further
Now the that basis and mechanics of the interactive story are in place, you can add many things to continue it:
- backdrops
- other characters to dialogue with
- another character that follows the octopus (e.g. a shark)
- make a level with hidden treasure to find by clicking on it
- …
There are infinite possibilities with Scratch – it’s up to your imagination!