Overview
This activity consists of five steps:
- Creating a backdrop
- Creating the player character, a projectile and zombie
- Animating the hero
- Animating the projectile
- Animating the zombie
Step 1: Creating a backdrop
1. In the creation window, click the backdrop logo on the bottom right of the screen. Choose a backdrop from the Scratch library. You can also go to pixabay.com and search ‘Halloween’ to find a wider choice of backdrops and make the game even scarier. Add the blue bar to the right of the image by going to the ‘Backdrop’ tab on the top left page. 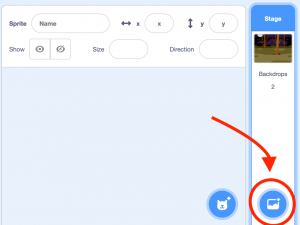
2. We will now make a timer. For this, go to ‘Variables’ then ‘Make a Variable’ and call it ‘Timer’. You can now program the backdrop. Under the ‘Code’ tab (top left), write the following script which will allow the timer to function: 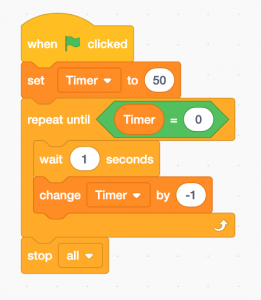
Step 2: Creating a character, a projectile and zombies
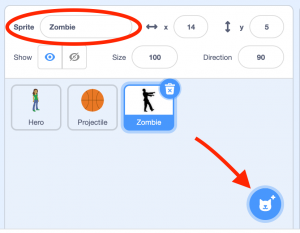
Use three sprites from the library: a player character, a projectile and a zombie (this example was taken from pixabay.com). Name them ‘hero, ‘projectile’ and ‘zombie’ respectively by clicking the field circled below
. 
Step 3: Animating the character
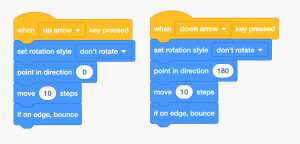
1. First you will need to set the starting position of your protagonist. Then you will assign movement to the character through the directional arrow keys. For this, write the following scripts for the ‘Hero’ sprite (click first on the ‘Code’ window). Then the character will move vertically. The horizontal position can be modified to adjusting the value of x.

When the green flag is clicked, the sprite will place itself on the backdrop at x= 170 and y= -37
When the player presses the up arrow, the sprite points up (0°) and moves by 10 units. When the down arrow is pressed, the sprite moves down (180°) and moves by 10 units. If the edge is reached, the sprite is pushed back so as it not exit the screen. The block referring to rotation style keeps the character standing upright.
2. Set up the scoring system. Make a new variable called ‘Score’ and apply to it to all sprites. Make it so that the game stops when the hero is touched by a zombie and that a ‘Game Over’ message appears. For this, copy the following blocks to Hero’s script.
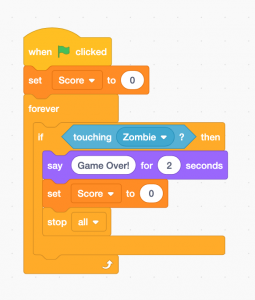
When the flag is clicked, the value of ‘Score’ will be set to 0. If Hero touches Zombie, the former says ‘Game Over!’ for 2 seconds, the value of Score drop to 0 and all the programs stop. These conditions are constantly verified.
Step 4: Animating the projectile
1. First, set the starting position of the projectile. It should appear on the character and and move as if it had been shot. It should also disappear when it touches the edge or a zombie. In the projectile’s script, copy the following:
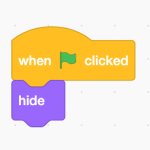
Now, the sprite will not appear when the green flag is clicked. 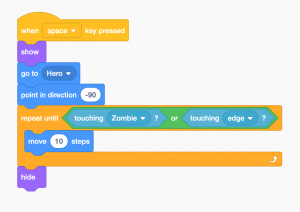
When the space bar is clicked, the sprite will appear at the level of the ‘Hero’, will move towards the left and move by 10 until it touches ‘Zombie’ or the edge of field. Then it will disappear.
Step 5 : Animating the zombies
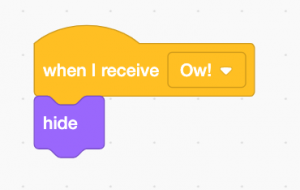
1. We will now program the zombie so that it disappears when it is hit by the projectile. Doing this will win 1 point. Go to the zombie’s ‘Code’ tab and copy the below blocks. When it is hit, the zombie should send the message ‘Ow!’ to all sprites.
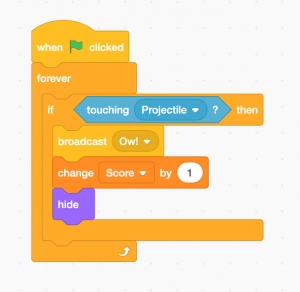
When the flag is clicked, the following condition will be constantly verified: if the ‘Projectile’ sprite is touched, the message ‘Ow!’ will be sent to all game elements (sprites and backdrop) and the value of the score variable will increase by 1. 2. Test the game. You will notice that the zombie doesn’t move and that the projectile does not yet disappear when it touches the zombie. Fix this quickly by reusing the ‘Ow!’ message. Copy these new blocks to the projectile’s code:
When the projectile receives the ‘Ow!’ message, it will disappear. 3. Now we will animate the zombie a little. It should appear randomly at the left of the screen and move until it reaches the edge of the playing space or until it is hit. Go to the ‘Sound’ tab and click on the speaker icon on the bottom left of the screen. Use the ‘Chomp’ sound effect from the library. Now you have everything you need to program a really terrifying zombie. You can also spice up the game by having the player lose 1 point if the zombie touches the right of the screen. Copy the following to the zombie’s code.

When the flag is clicked, the zombie won’t appear. It will permanently place itself at the left of the screen (x= -174) and randomly on the vertical axis (y= random number between 120 and -80). Then it will appear, point towards the right (90), produce the chomp sound effect and move by 4 units until it touches either the character or the edge. Then it will disappear, wait 1 second then start the loop again. If it touches the purple colour (the line we placed on the right edge of the screen), it will disappear and the score will increase by 1 point.
4. Test the code again. It works! But only one zombie is a little boring no? Duplicate it by right-clicking on the sprite icon and choosing duplicate. Do this again and you will now have three hungry zombies and a completed game! Congrats!
Bonus
Ways to improve the game:
- Assign the zombies different speeds
- Make a more complex point counter system including rare and more complex zombies
- Create a life counter system