This workshop was originally designed for adolescents, since the use of the Snapchat social media is rather predominant among that age group. It will focus on showing that beyond simply sending pictures, snapchat can also be used to share information.
General Objective
Preparation time for facilitator
Competence area
Time needed to complete activity (for learner)
Name of author
Support material needed for training
Resource originally created in
Introduction
On Snapchat Discover, we can keep up to date with the what’s going on in the world. Of course, the service has its share of videos and cat photos, top 10 lists on anything you can think of. There are also articles on news and current events. Many major media platforms tailor content for Snapchat Discover, for example, the New York Times, National Geographic, the Wall Street. Participants will see how to inform themselves on Snapchat and then pass on information through this same platform.
Workshop preparation: Install Snapchat on your phone and familiarise yourself with the app if you are not experienced with it. If you need them there are tutorial videos you can refer to. Explore Snapchat by clicking on the icon at the bottom of the screen. Download on Android Download on iPhone
Facilitation tip: This workshop should follow others on information sources, search engines and on online copyright. For example: ‘Using and Differentiating Search Engines‘, ‘Digital Commons #1: Right to Use‘.
Kicking off
Ask participants:
- Who already has Snapchat
- Who uses it to keep informed (and what kind of information)
- Why they use it and how often
This is a good introduction to get an idea of their knowledge and use of the app. Ask all participants to open the app. Being one of the most popular social media platforms amongst under 25s, most will surely have it already. If not and they would like to, they can download it. Ask everyone in turn to list the first 10 sources/links/headlines on Snapchat Discover. These will be different for each person. Stories are posted in reverse chronological order but also depending on the interests of the user.
For example:
Let them explore (Source) . They will next have to tell you the types of information they find, the points in common and the most common kinds of posts shared by the media. Some possible responses:
- On formats: they might distinguish videos, photographs, infographics, animations or simple images with text
- They can take a look at Snapchat exclusive. This content tends to be flashy and a little rough around the edges, offering the bare bones of stories without style or superfluity. This is in order to attract younger users to consume information differently – that is to say quickly – by clicking what they want depending on their interests.
Searching for an 'informative' Snapchat story
Explain to participants that they will create an informative Snapchat story. The goal: end up with 5 ‘slides’, or pieces of content. Divide participants into groups of two or three. Each group will choose a theme. This could be something relevant to current events. Ask them to choose a subject different to the ones they may have just seen while exploring Snapchat Discover. Next, they will choose formats. Propose the following:
- a slideshow. Depending on the subject. For example, women’s magazines may make slideshows on Discover to show Miss Universe candidates, or to show how celebrities were dressed on a particular occasion.
- a series of images: this can be photographs, different illustrations with more text and explanations. Drawings can also be made if some amongst the group want to try!
Once the theme is chosen, participants will do some online research using their phones. It won’t be enough to simply take some images and assemble them. Remind them that to deliver information is to tell a story. The idea is to tell a story. Every image – each slide – should expand on the narrative. Take for example a week of flooding in the South of France. In reporting such a story, the media may have taken 4 images to correspond to the following:
- Last week, 200mms of rain fell in one morning. Unprecedented!
- The flooding led to 14 deaths
- Property damage: 10000 homes were inundated 20000 people remain without electricity.
- The President is leading an emergency response
Their story can be more elaborate. To research, remind them to check many sources – social media, institutional sites, media – the main thing is that the information is true. Therefore, after compiling their information, participants should a list of images they have downloaded as well as precise information they will include in their story. They can also take photos themselves where appropriate.
Facilitation tip: For efficiency, they can download chosen images directly to their phone. Otherwise, you would need a cable to transfer the images from the computer they may be working on to their phones.
If you have time: If there is time remaining, if the groups are keen to spruce up their stories visually, you can propose that participants make their images on a computer using a free graphic design tool. For example, once they have chosen images, they can go to Fotor.
Realise that the media use their own graphic design tools, Photoshop for example. As you won’t have access to this, Fotor will do the job fine. Once on Fotor, participants should click on ‘Make a Collage’ then on ‘Classic Collage’ or ‘Artistic Collage’ or whichever they like. Leave them the time to come to grips with the tool. It is easy to use – it just needs to be explored a little. Help them if necessary. With Fotor, they will be able to put headlines and coloured text commonly seen on Snapchat. If you don’t use Fotor, no panic. For this exercise, the filters, texts and emojis included in the Snapchat app will be more than enough!
Creating your own Snapchat story
Participants will now create their story. The user interface (UI) and appearance of Snapchat changes regularly. Let them look around and learn how the current UI works if necessary. Generally, here’s what should be done:
- On their profile, click ‘Create New Story’
- They will next need to choose who is able to see what they post – to whom the story will be sent. For this exercise click on ‘Private Story’. They will then choose and add one of their classmates as the only person who can view their story.
- Name their story
Next, once they have downloaded their selected images to their phone, go to ‘Memories’. When they open Snapchat, these are the two little cards at the bottom of the screen near the circle touched to take a photo.
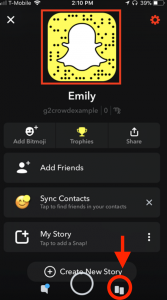 (Source)
To upload their images, they touch cards and go to ‘Camera’ and select their desired picture. Be aware that these photos will appear in the story in the order they were uploaded! Once the image is selected, they can modify it. They mustn’t forget that a story has to be told. Aside from filters and emojis, then can also add text and links! Again, they will learn through exploration. Once their image (now a Snap) is ready, click on send (icon on the bottom left), then click on the name of the story that will appear. Their first image has now been created! They just need to repeat this for the rest of the images.