This is a tutorial on how to make a simple racing game in Scratch.
General Objective
Preparation time for facilitator
Competence area
Time needed to complete activity (for learner)
Name of author
Support material needed for training
Resource originally created in
Introductory steps
The goal of this activity is to have a car traverse a circuit. If it touches the edges of the track, it should return to the starting point. If it touches the finishing line, the player wins.
Designing the circuit and creating a new sprite
- Create a new Scratch project and hover over the backdrop icon (bottom right of the creation screen), then click the paint icon.
- Ensure you’re in bitmap mode. If you are in Vector mode, click ‘Convert to Bitmap’ under the illustration field.

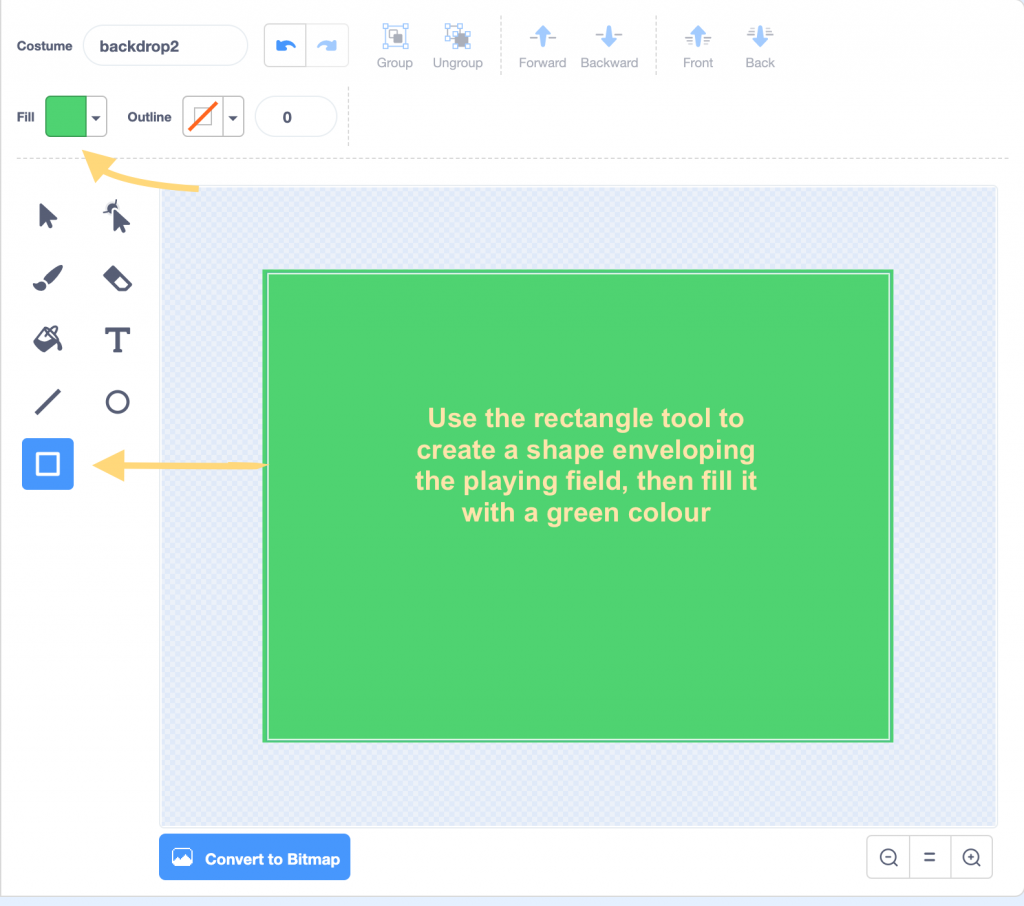
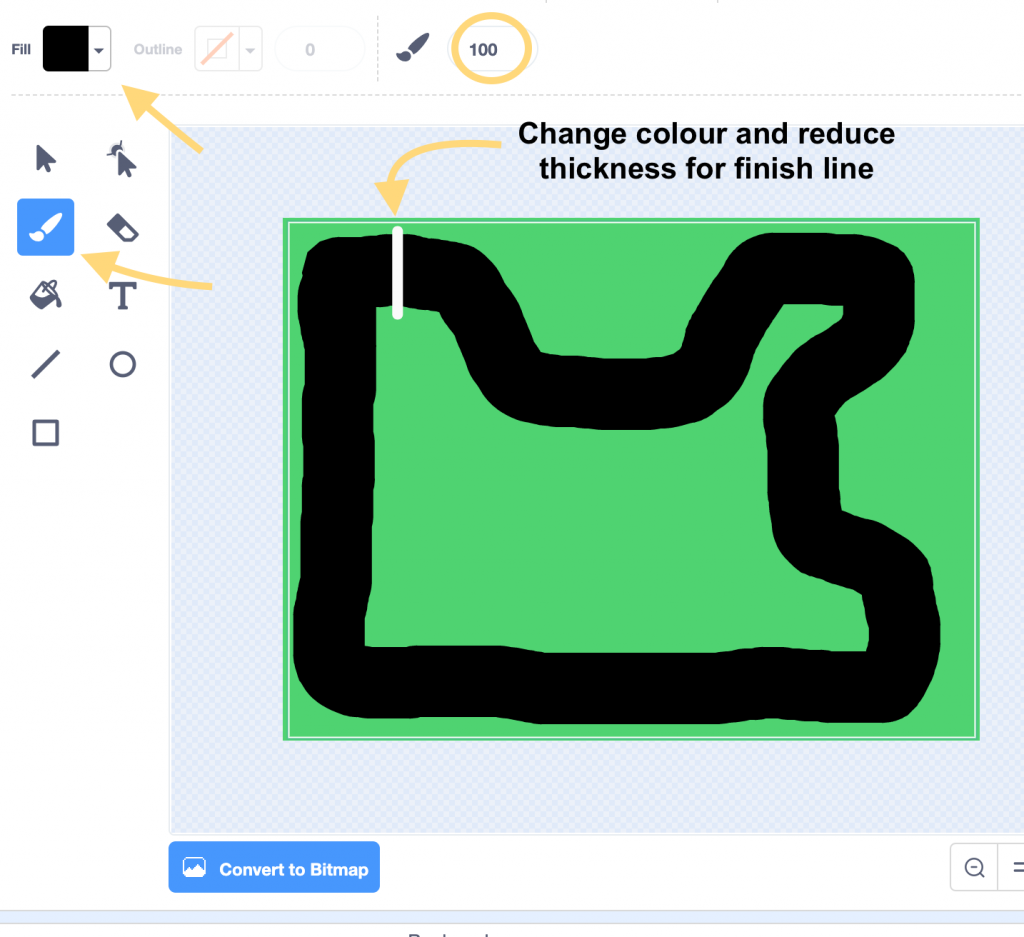
- Fill with green, then draw a black track using the paintbrush of maximum thickness. With a thinner line of a different colour, draw a straight line corresponding to the arrival line.
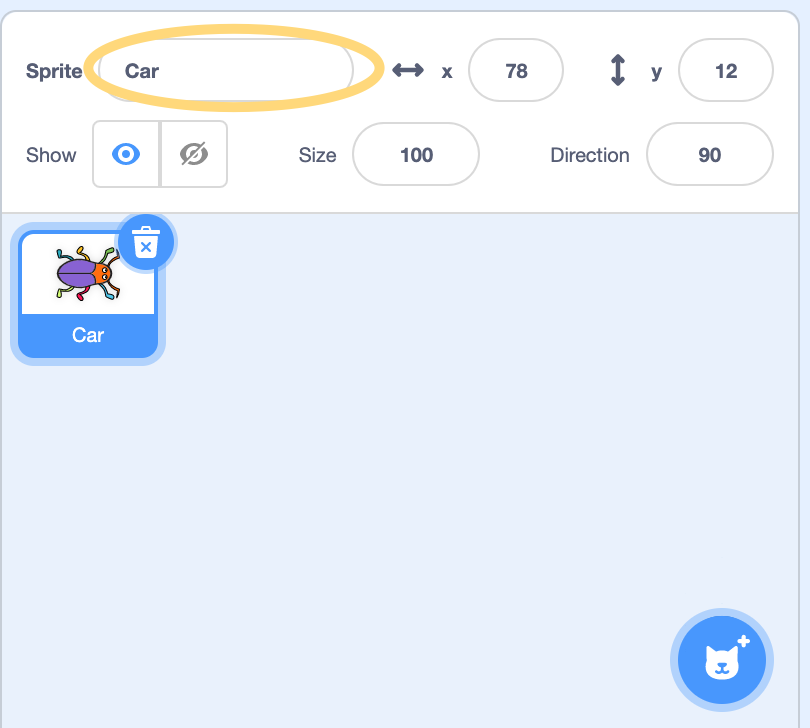
- Delete the default cat sprite by click it and selecting the trashcan that appears over its selection pane. Create a new sprite representing a car but choosing an image from the library (click the cat-shaped sprite icon near the bottom right of the screen). Choose something small rather than something long or pointed – it will be easier to program. Here we have chosen ‘Beetle’.
- Rename the sprite ‘car’ by clicking on the name field.
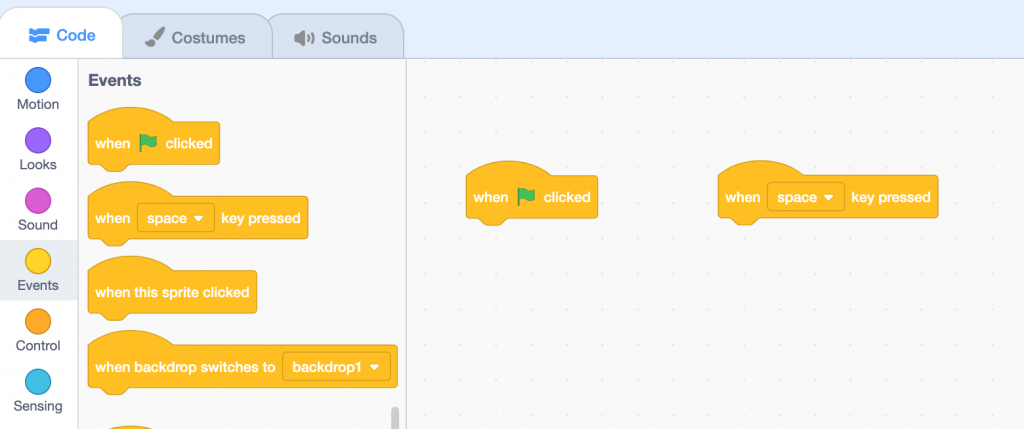
Select two events (blocks) from which the program will react.
From the ‘Events’ selection, drag/drop the following to the programming area
- A “when green flag is clicked’ block to start the game
- A ‘space key is clicked’ to make the car go forward
Programming events to follow clicking the green flag – starting the game
- Add a scaling block to set the initial size so that the size of the car is about one third that of the circuit :
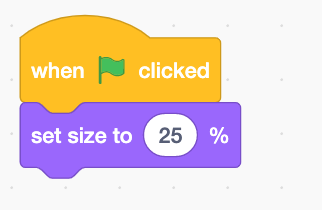
- When you click the green flag, the program executes its instruction and changes the car’s size to the given value.
- Drag/drop the car with the cursor to place it in front of the finish line, without it touching this line nor the edges of the road. The sprite’s coordinates are displayed under the backdrop/playing field. Note the car’s coordinates when you place it (e.g. x = -136, y= 144).
- We will now add a block that makes the car start at this position when the game starts, i.e. when we click on the green flag.
- In the ‘motion’ category, we have the choice between the ‘go to x:__ y:__’ block and the ‘glide __ secs to x:__ y:__’ block to move or glide the car to the starting coordinates.
- We will pick the second one.
- Add the ‘glide __ secs to x:__ y:__’ block after the scaling block added previously, then enter the correct coordinates. They should be the same as the ones you noted before
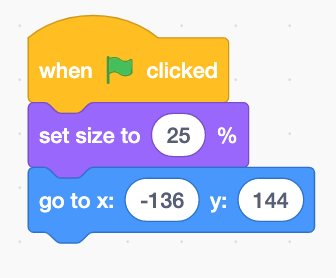
- If you have placed the car in the right position previously, the coordinates will be correct because new blocks automatically take on the coordinates of the most recent placement.
- To test, place the car anywhere and click on the green flag. The car should return to the departure point. Note 1: avoid explaining in detail how the coordination system works — you only need to let participants know why the sprite goes to the right place. Note 2: you can also add an orientation block so that the car points in the direction of the track (this avoids the outcome of the car touching the edge due to being pointed to the wrong way).
Program events to follow ‘when space key pressed’ — moving the car
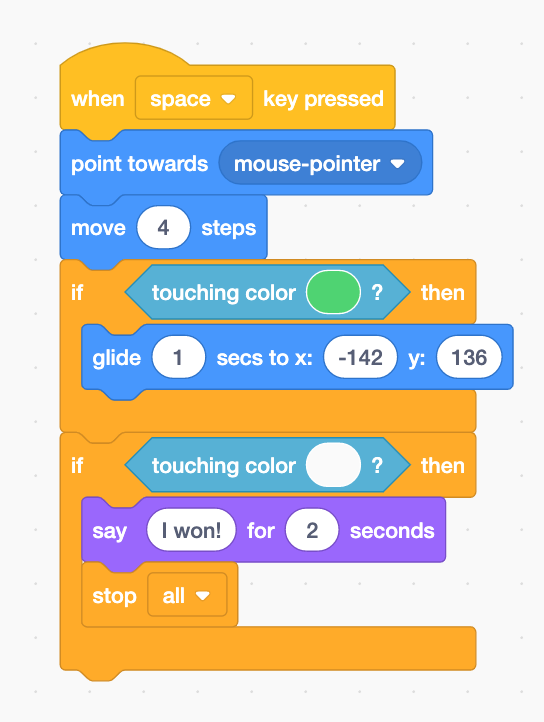
- Add an orientation block pointing towards the cursor
- Add a movement block (move 4 steps)
Note : If the space key is held after the execution of these first two blocks, they will be executed again since the space key is still pressed. Therefore, the car will move as long as the space key is pressed. We will modify this in a future version.
Test the game and discuss what to do next :
- Return to the starting point if green is touched
- Game ends when car touches blue (finishing line).
Complete the program to finish the car
- Add a conditional control block: ‘if…then’
- Insert a ‘touching colour’ test and choose the correct colour using the eyedropper tool
- Inside the test block, duplicate the block that sends the car to the starting point. This block will only be executed if the test’s condition is met (i.e. if the car is touching green).
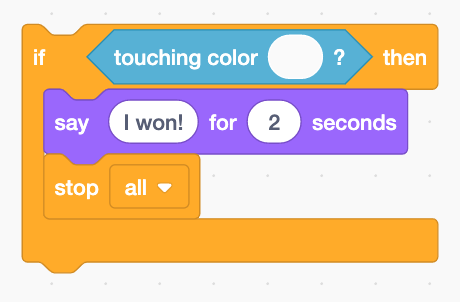
- Duplicate the conditional block but use the finishing line’s colour.
- Inside this, place the block that displays ‘I won’, then add ‘stop all’
Reviewing main concepts
- Programming : we program to create something, like a game or application which is designed to be useful. The most successful games are those for which whose creators really consider the player’s experience and cater the game to that.
- A program is constructed using sequences of blocks which are triggered by an event. The sequence of instructions corresponding to each event is called a script. Each sprite has its own script (for example in what we did today, we wrote the car’s script). Programs can have many sprites and corresponding scripts. It sometimes becomes difficult to remember them.

- Block colours : these correspond to their functional categorie– Yellow for events which start block sequences, for example when the player clicks on the green flag or presses the space key.
– Orange for the control blocks which can be used to modify how the program runs. We used one of these above: the ‘if…then’ clauses for which the internal instructions are only executed if the conditions are verified/true
– Blue for motion blocks: movement and orientation.
– Purple for blocks that modify appearance, including size, colour and text bubble
– Magenta for sounds which we will use later
– Light blue for sensors, such as the block that senses when a particular colour is touched
– Green for calculations
– Orange for variables
– Red for custom blocks
- The block shapes correspond to their character and the way they can be assembled.
- Most blocks have a notch on the top and underneath. We can lock them together in sequence and are executed in order from top to bottom.
- Certain blocks are rounded on top meaning we cannot place anything before them. These start each script and usually correspond to events which take place outside the program, for example when the player clicks on the green flag. (We will see later that the program can also generate events using messages).
- Certain block are flat on the bottom so nothing can be placed below them. This is the case with the ‘stop ___’ block.
- There are also blocks that don’t have notches but are rounded or pointed on the edges. These blocks contain a value that we can insert into other blocks. for example control conditions.
- Pointed blocks can only represent one of two values, true or false. They correspond to that we call Boolean variables. We usually use them in control blocks, for example, to determine whether a certain condition is met
-
- Rounded block can contain numbers or text
- The values of rounded blocks can be a component in a calculation or test, for example:
- Rounded block can contain numbers or text
-
-
-
- containing a false value
- containing the textual value ‘You lost’
- containing the value 7
-
-
![]()
![]()
![]()
Preparing the next steps
Discuss the game with participants and ways to improve it. As this will be there 1st their 2nd exercise on Scratch, you shouldn’t allow them to go to free creation time, but you can base the next lessons on improving the first version. We suggest the below ideas. We have categorised them in a suggested order of complexity.
- Adding sounds
- Counting lives (ending the game when the car runs out of lives)
- Changing the car’s speed, accelerating and decelerating
- Timing laps
- Choosing and changing cars
- Adding obstacles
- Attaching cars, throwing objects
- Collecting fuel, running out of fuel
- Creating several levels